Last fall I spied this absolutely charming mustache fabric on Etsy. It was from a shop called New Mom Designs, which I immediately added to my favorites. I knew that I had to have the fabric, and although I wasn’t quite sure what to make with it, I was certain that it was destined for greatness. The fabric {100% organic cotton} is called “Moustache All Over”. I ordered some. I have a fabric weakness (probably more like a fetish or addiction), I couldn’t help it. The fabric came wrapped in such a cute bundle with a gorgeous little business card (I think the card was created on moo.com, another thing on my list of wants!) and it didn’t disappoint – gorgeous fabric! And I just love the feel of organic cotton, so smooth. Okay enough with the fabric. Now I actually need to make something with it.
Since the fabric is somewhat man-ish I felt that I should try and make something for my husband. He travels for work {a lot!} so I wanted to make him a travel organizer. And when I say “make him a travel organizer” I have to admit that I had an ulterior motive. Our family was planning a big vacation that was coming up very quickly, so while I made this for him, I wanted to make something that would be functional for our entire family. I introduce you to:
I would say that I have travelled a pretty good number of times throughout my life so far. I had a pretty good idea of the features that I wanted to build into my travel organizer in order to make it super convenient. Let me explain them to you.
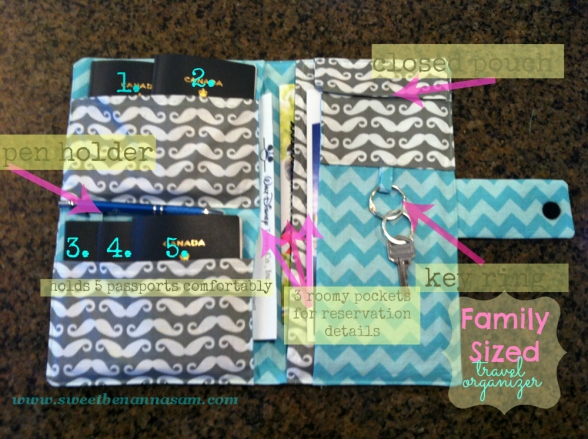
- We have five people in our family, so obviously we needed enough space to hold all of our passports – there are two pockets on the left hand side which hold exactly this amount, you could probably even fit one more in to make it six.
Also on the left hand side I have included a pen holder. You never know when you will need a pen (like on an airplane when there is a sleeping child on your lap and you need to fill out a customs declaration card)
- There are three spacious pockets (one on the left, two on the right) to hold all of your reservation details and e-tickets. Big families need lots of room! On this trip we had: car rental confirmation, two flight e-tickets, two separate hotel reservations, plus our Disney cruise documents. When we received our boarding passes at the airport, we also put them in these pockets.
There is a closed velcro pouch on the right hand side, why? I wanted to have everything that we would need at the airport within easy access. For this pouch I thought of putting in: parking ticket for easy access upon our return, coins or some money for snacks or treats at the airport, custom declaration cards, and any receipts for shopping that you may need to declare at customs.
- Last but not least I wanted to include a key ring holder for my car keys. I cannot begin to tell you how many times I have returned home, dead tired after a very long flight, just to waste time trying to remember where I have put my keys.
So if you would like to make one for yourself, here is the tutorial!
——————————————————————————————————————————————————————————————————————–
- 1/2 yard each of two different coordinating fabrics (one yard total) herein referred to as “fabric a” and “fabric b”
- scraps of medium to heavy weight fusible interfacing
- velcro (I use round stick on velcro tabs)
- coordinating thread
- basic sewing supplies and sewing machine
- metal keyring (optional)
Now let’s get all of your pieces cut out. Fabric A is going to be the fabric that you will see on the outside of the travel organizer, for me this was the grey mustache fabric. Here is the list of all of the fabric pieces that you will need to cut out for this project. For accuracy I always use my Olfa rotary cutter and quilting square ruler, but if you don’t have these supplies no worries! Good old fashioned scissors will work too.
There are lots of fabric pieces, it may make it easier for you to follow my tutorial if you label each piece of fabric. A piece of masking tape with the measurements written down works well. First we are going to make the velcro closure piece. Take your 4 1/2″ x 2 1/2″ piece that you cut from fabric b and your piece of interfacing of the same size. Iron the fusible interfacing to the wrong side of the fabric. Measure down approximately 1″ from one of the short ends and attach your velcro in the middle. Mine had a sticky back so I stuck it on and then stitched it in place with my sewing machine.
Next take the 4 1/2″x 2 1/2″ piece from fabric a. Pin it right sides together and sew with 1/4″ seam around three of the sides; leave the short end open that DOES NOT have the velcro. So you are going to sew along both long ends and the short side with the velcro. Turn your closure right side out and press with your iron. Topstitch around the three sewn sides. Put your closure aside for now, we are going to work on the passport pockets.
Grab the two 5″ x 7″ pieces from fabric a. Decide which is going to be the bottom pocket. Fold the top long edge of this pocket over 1/4″ to the wrong side and press with your iron. Fold it over another 1/4″ and press again. Stitch into place. Take your second 5″x7″ piece; this will be the top passport pocket. You will repeat what you did with the first pocket, but you will also fold the bottom of the pocket over 1/4″ to the wrong side (just once!) and press it into place. Just to confirm what we have now done: – you should have one pocket in fabric a with the top long edge folded over and stitched into place, – you should have a second pocket in fabric a with the top long edge folded over and stitched into place, PLUS the bottom edge folded over once to the wrong side and pressed with your iron, but not stitched into place.
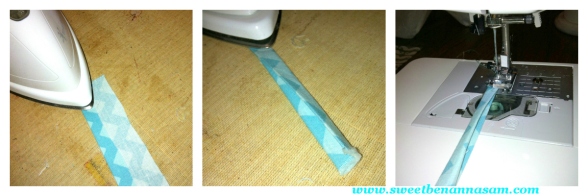
Now put the two pockets aside, we are going to make the little fabric pieces for the pen holder and the key ring. Grab your two small pieces measuring 3″x 1 1/2″ from fabric b. Take them to your ironing board and fold them in half lengthwise and press. Open up the fabric and fold each long side to the middle and press into place. Lastly, fold each one in half again and press. Take each strip to your sewing maching and sew the long open edge shut.
Now we are going to assemble the left side of the travel organizer. Take one of your 7″x12″ pieces from fabric b. Grab your passport pocket that DOES NOT have the bottom edge folded over. Place it on top of your 5″x7″ piece, right sides facing up. Line up the bottom edge of your pocket with the bottom edge of your 5″x7″ piece. Baste the two pieces of fabric together at the bottom. Take the second pocket that has the bottom edge ironed over. Place it 2″ above the top of the other pocket. Grab one of the fabric strips that you just sewed for the pen holder. Fold it in half and place the two edges underneath the bottom of your top pocket, about 1 1/2″ in from the left side. Stitch the pocket to the 5″x7″ piece along the bottom. Make sure you catch both ends of the pen holder piece in your stitches.
Take your other 7″x12″ piece of fabric b. Place it on top of your first 5″x7″ piece with the passport pockets, right sides together. You are going to down the right side with 1/4″ seam. Make sure you are catching the right edges of the passport pockets in your stitching. Open up the fabric and fold the top piece around to the back, press with your iron. Top stitch down the right side of your fabric.
The left side is done, now we will work on the right side of the travel organizer. First we are going to make the little velcro pouch for the top right side. Take your one piece of 4″x5″ from fabric a. Fold it in half, right sides together. Stitch down both of the short sides to the folded edge, leaving the one long edge open. Turn it right side out and press it with your iron. This is the flap for your pocket, so you will need to decide which is the top-side and which is the under-side. Attach a piece of velcro to the under-side, down towards the centre of the folded edge. The open side will be at the top of the organizer. Edge stitch around the three sewn edges of the flap.
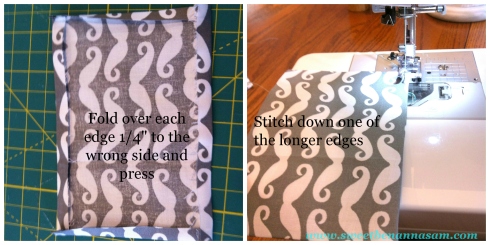
Next take your piece of fabric a that measures 4 1/2″x5″. Fold over each edge 1/4″ to the wrong side and press with your iron. One of the longer edges will be the top of the pocket. Choose which side and sew down that folded edge. Next line up the flap so that it is overlapping the pocket by about an inch so that you can figure out where you would like to place the other side of the velcro closure. It should be near the middle top of your pocket.
Next take your 6″x12″ piece of fabric b. Fold over the left long edge 1/4″ to the wrong side; press with your iron. Fold over one more time 1/4″ and press. Stitch down the folded side to secure it into place. Take your pocket flap and place it at the top left-hand corner of this fabric, right sides facing up. Baste it into place along the top. Take your pocket piece and place it, face up, with the top part just underneath the flap. Make sure that the velcro will line up. Sew the pocket onto the rectangular piece of fabric by sewing down the left short side, across the bottom BUT stop along the bottom around the middle of the pocket. Take your second fabric strip that you sewed previously (this is for they key ring). Fold it in half and tuck the two edges under the bottom of the pocket, just like you did for the passport pocket. Continue sewing, securing the fabric strip into place, and then continue to sew up the right side of the pocket. The pocket should now be secured with the top edge left open.
Grab your 12″x7″ piece of fabric a. Once again, fold the left long edge over 1/4″ towards the wrong side and press, do this again and then stitch it into place. The last piece of fabric that we have to prepare before assembling the travel organizer is the large piece of fabric b that measures 12″long x14″ wide. Take this piece of fabric and the interfacing that is the same size. Fuse the interfacing to the wrong side of this fabric piece. Now let’s put it all together!
Place the large piece of fabric b with the interfaced side down; right side up. Take your left side with the passport pockets and place it, right side up, on the left side of the large fabric piece. Then take the last pocket that you just sewed (12×7 fabric a). Place it right side up; line up the unsewn edge with the right long edge of the large piece of fabric. Next layer your pocket on top that has the velcro pouch attached to it. Again the un-sewn edge should line up with the right long edge of the large 12×14 piece of fabric. Now get your velcro closure, the first piece that we sewed. Place it halfway down on the right side. The raw edges should be lined up with the right edge of the fabric, in fact I like to have it sticking out just slightly just to make sure that it gets secured into place. Make sure that you are placing the closure so that FABRIC A is facing up, and FABRIC B with the velcro is facing down. Have a look at the pictures below:
Now we are going to sew it all together. Take your last piece of fabric, which should be the 12″x14″ fabric a piece. Sandwich it on top of the organizer, wrong side facing up, right sides together. Pin it together all the way around. Sew all the way around the edge with 1/4″ seam allowance, but leave a space open along the bottom on the left hand side, about 2 inches wide. IT IS VERY IMPORTANT to make sure that you catch all of the pocket edges when you are sewing your travel organizer together. Turn your travel organizer right side out, make sure you poke all of the little corner so they are square. Use your iron to press it and make it look nice! Before you sew up that hole, there is a reason that we left it open on the bottom left hand side. Fold your travel organizer in half (in the closed position). Figure out where your velcro lines up, and put the coordinating piece of velcro on that spot. You will have to reach up inside your travel organizer to hand-stitch it into place. Lastly, edge stitch all the way around the outside of your travel organizer. When you get to the open spot, fold it under (it’s a good idea to press it under with your iron) and edge stitch the hole close.
The last little touch I added was a metal keyring to the keyring holder. I got a bunch of these in a grab bag from Pick Your Plum, maybe  not the intended purpose but it worked for me!
I hope you have enjoyed this tutorial. There are so many great sewing projects that are travel related – I can’t wait to create some more in the future!


